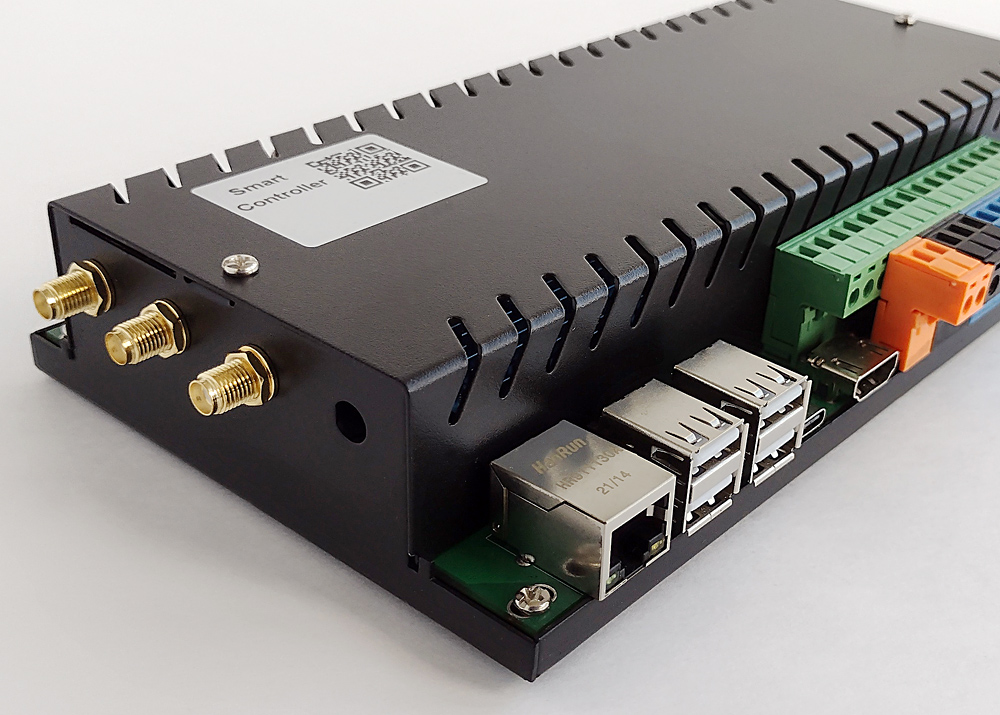
And now we’ve finally reached the pinnacle of Kincony’s technical creativity, its flagship 868-series controller, the KC868-Server. When I first saw this controller, I simply did not have words – it seems that this is the embodied dream of any “automator” and geek – what is not there: ESP32, Raspberry Pi and ARM Cortex M3 in one bottle and all this is equipped with a bunch of peripherals, connectors, antennas, etc. Such a platform can become the powerfull system for the development of any, even the most sophisticated automation project – such a concentration of features on one board. I simply have not met before, only Wi-Fi modules on the KC868-Server 3 pieces, 2 wired Ethernet, 2 MCUs and plus a full-fledged Linux computer – as one famous character said “yes it’s just a holiday of some kind”. I would say that the Kincony KC868-Server is not a controller, but just an atomic bomb and, of course, we will not be able to deny ourselves the pleasure of getting to know it better, disassemble its device and, maybe even “saw” on it a few mind-blowing IoT projects. So, let’s start…
Controller Hybridization
I’ll start from afar… When developing DIY automation projects, there are often situations when the capabilities of one single controller are no longer enough. A good example here are the popular modules ESP8266 and ESP32 – they are sorely lacking in free GPIO pins. To circumvent this limitation, you have to either “collectively” various port extenders, or use a “partner” controller in conjunction with ESP32, for example, Mega 2560. In real projects, there are often tasks that make you think about the “hybridization” of controllers and the use of the useful properties of their various parts for the common good. If we compare the options for using port extenders or a partner MCU, then the second option is closer to me – we get not only the opportunity to get In general, in my projects I often use hybrid DIY controllers and Kincony KC868-Server fits perfectly into this concept – in it on one board there are 3 different controllers: ESP32, Raspberry Pi and ARM Cortex M3, and all these parts are connected by communications and can interact with each other. 3 controllers on one board is not just 3 controllers, this bundle has a synergistic effect and does not just add up the capabilities of individual parts, but significantly multiplies them. It’s no exaggeration to say that the KC868-Server will allow you to implement almost any of your IoT whims.
Appearance
The appearance of the Kincony KC868-Server commands respect – a metal case, decent size and weight, 8 (!) holes for installing antennas, a huge number of connectors – everything indicates that we are dealing with a serious device.
A line of connectors and only one connector for connecting an antenna are visible – a total of 4 antennas are involved in my configuration. On the back side, the KC868-Server looks as impressive as it does from the front. Photo to compare the size of the Kincony KC868-Server with its younger brother KC868-A4. By the way, the Server is designed (primarily) to manage numerous controllers of the KC868 family.
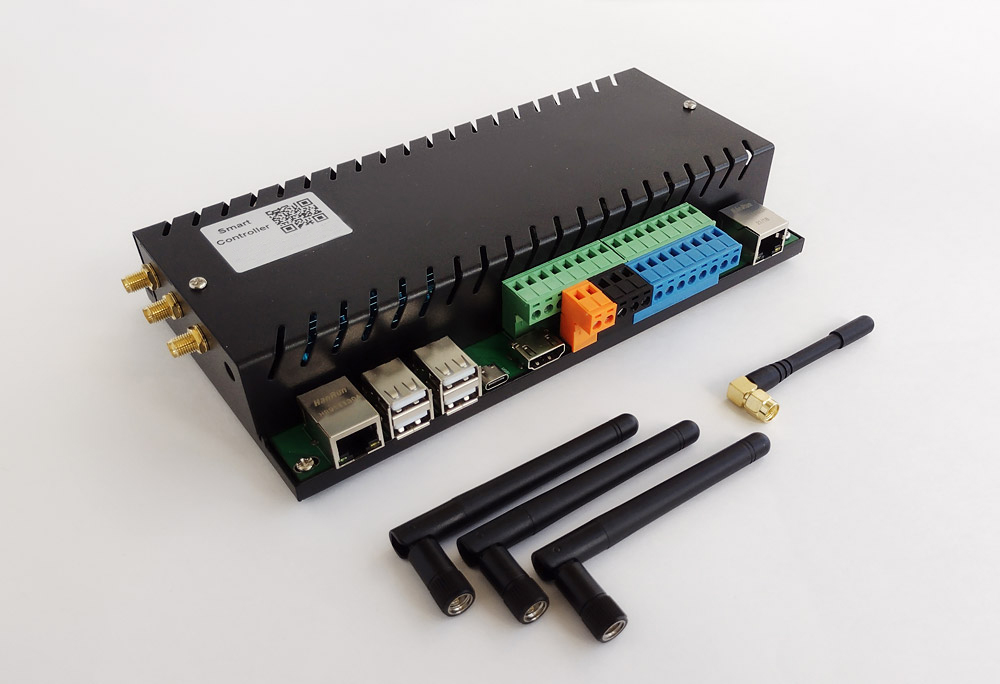
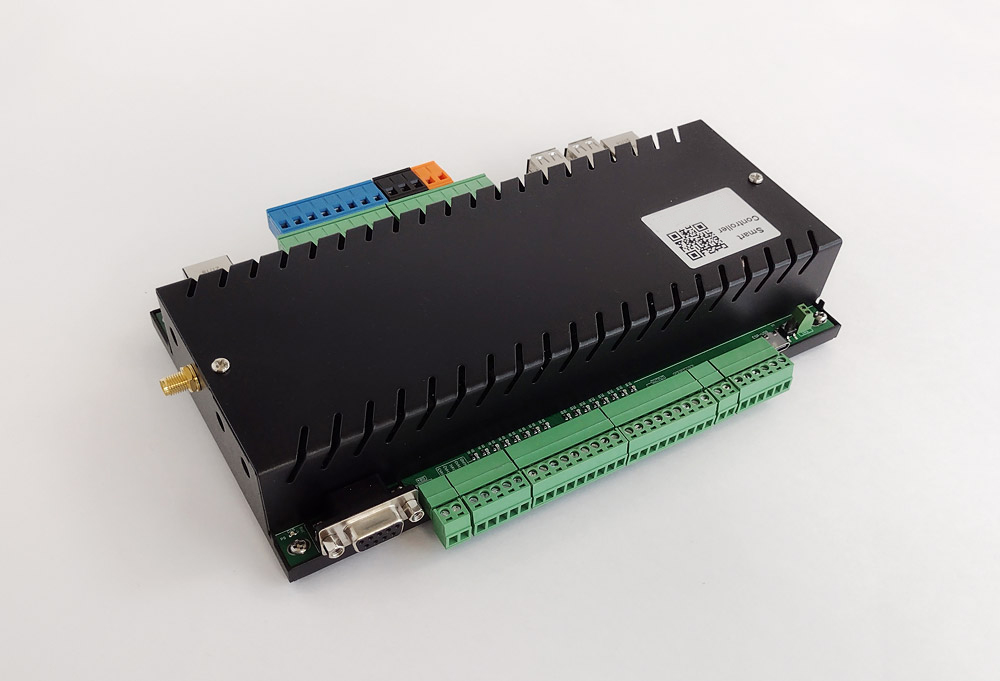
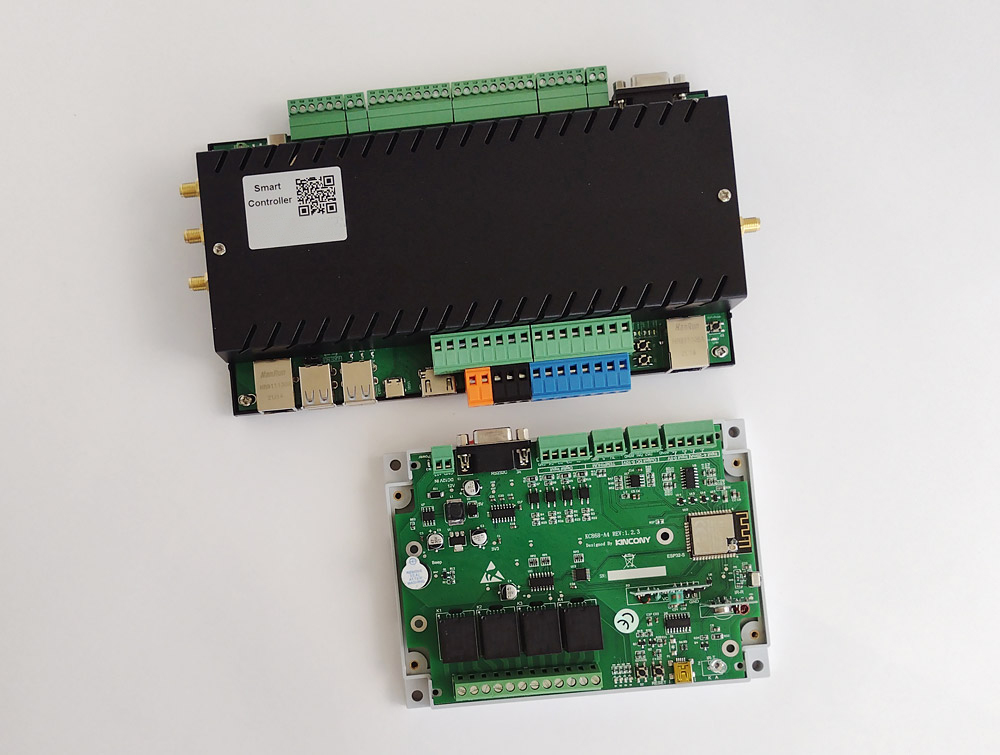
For comparison, server vs. the “little brother” A4
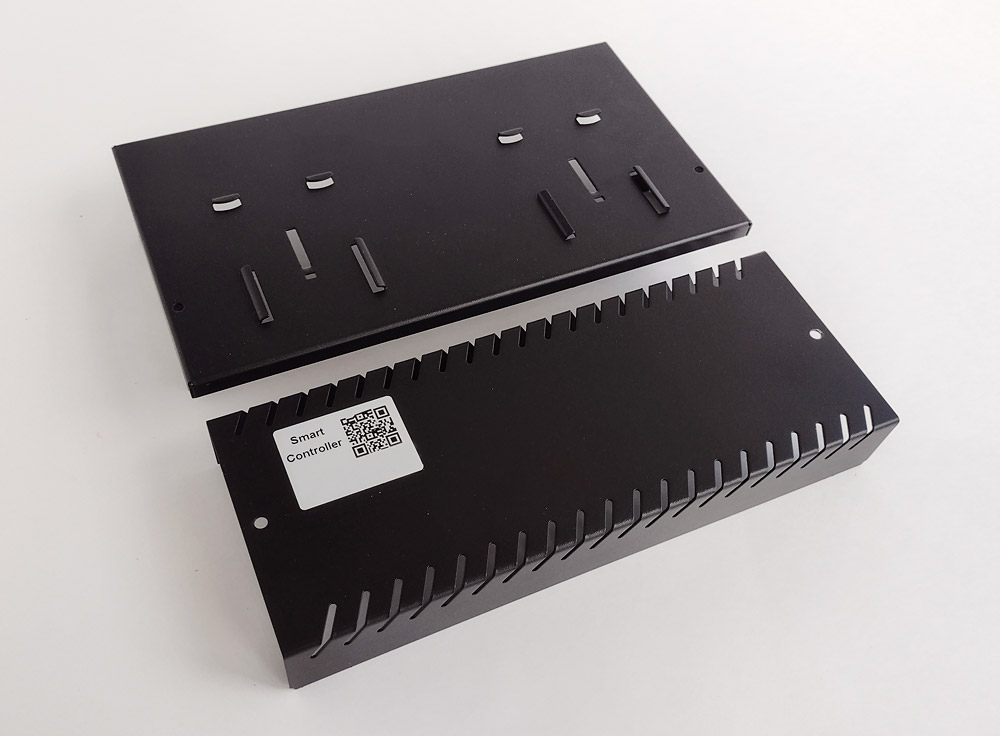
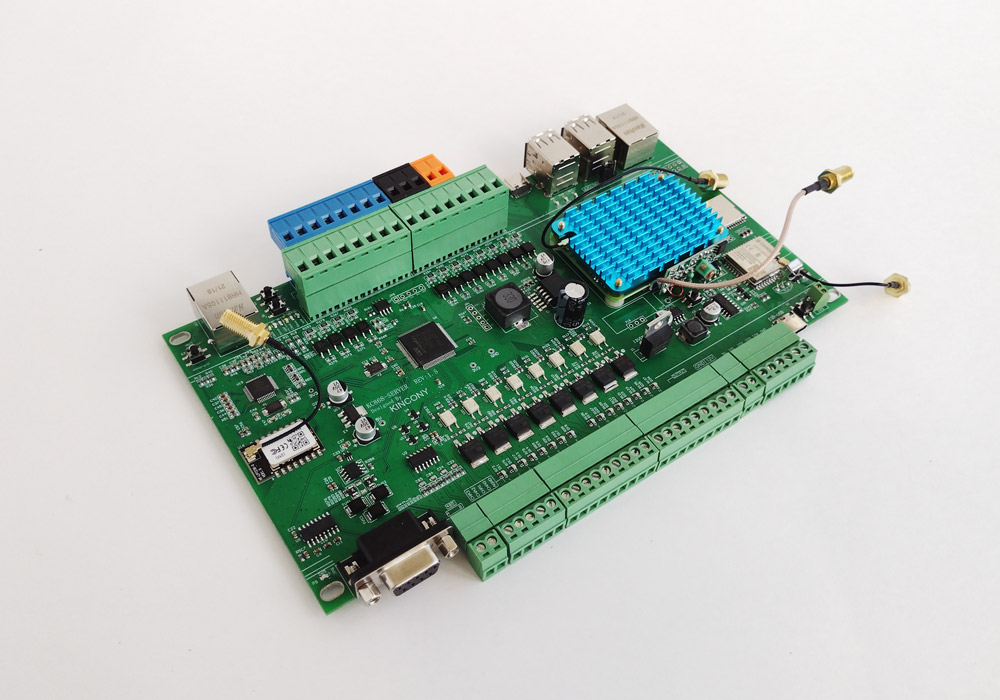
View of the controller with the top cover removed. Everything looks quite harmonious. Thanks to the availability of free space and if you really want, you can even supplement the KC868-Server with a display and buttons on the top cover of the case.View of the metal panels of the case separately. Everything is disassembled very simply, without any problems. On the basis you can see the mounts on the DIN-rail. And, finally, a photo of a separate KC868-Server board, extracted from the case. 3 Wi-Fi antennas and one antenna of the 433 MHz receiver module are visible (for some reason the 433 MHz transmitter module is not sealed at all).

Components of the KC868-Server
Now let’s talk about the KC868-Server and its component parts. Let’s start with a formal enumeration of resources for each part of the KC868-Server. Conventionally, the controller can be divided into 3 components:
- ESP32 Controller
- Raspberry Pi (CM4) Linux-based OS
- ARM Cortex M3 controller
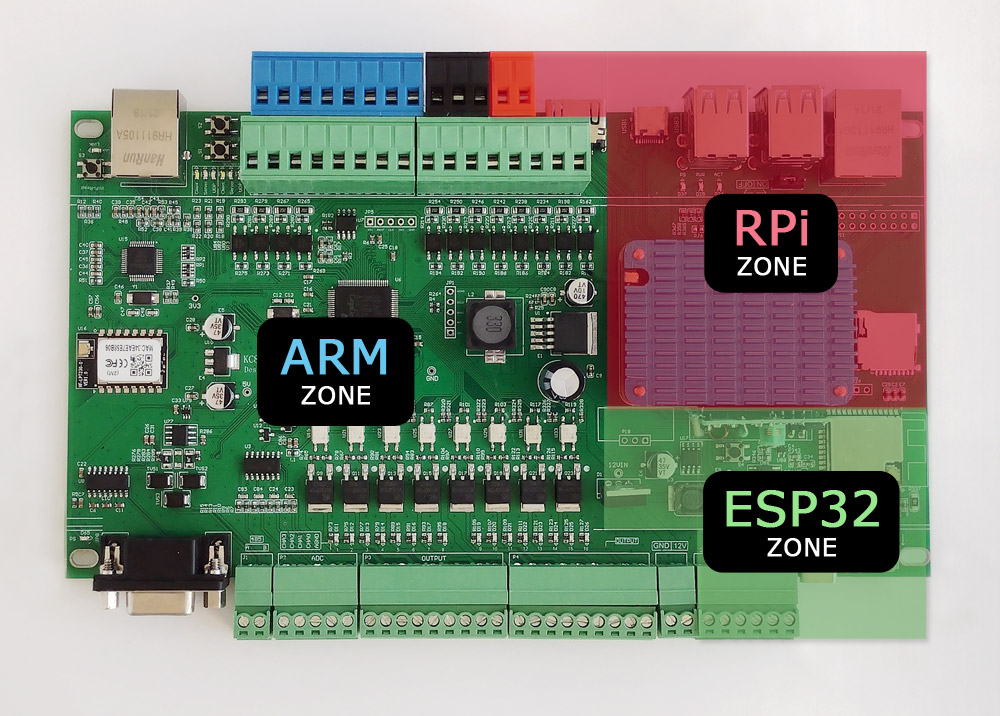
▍ ESP32 controller
As the name implies, this part is based on ESP32 and has all its inherent features – Wi-Fi, Bluetooth, 2 MCU cores, etc., in addition, the ESP32 part has:
- Infrared (IR) receiver and transmitter
- 433 MHz receiver and transmitter
- Output to the pad 4 GPIO
- Output to CONNECTOR 2 GPIO
- USB Type-C
- 2 Reset and User buttons
- Built-in Serial communication with arm Cortex M3 part
In other words, the ESP32 part can communicate wirelessly over Wi-Fi and / or Bluetooth, have its own server and web interface, control equipment via IR and exchange information with 433 MHz devices, and can also interact with sensors and other components by connecting to free GPIO displayed on the module and connectors on the board.
▍ Raspberry Pi (CM4) Linux-machine
The second part of the KC868-Server contains the Raspberry Pi Compute Module 4 (CM4) and its corresponding strapping and expansion on the KC868-Server board itself. This is a full-fledged Linux-minicomputer with all the features characteristic of such systems:
- Pi CM4 (Wi-Fi, Bluetooth)
- MicroSD Card Reader
- HDMI output
- RS485 port
- Connector with 26 GPIO
- USB Type-C
- 4 USB 2.0 (and the ability to connect any USB dongles to them)
- Ethernet connector
- Ability to boot from SD or USB C
Here we have (on board!) nothing more than a whole Raspberry Pi 4 Model B, complemented by the ability to work with the RS485 interface. Accordingly, we have at our disposal all the features of RPi 4 (almost limitless in the context of IoT applications), plus the ability to connect any USB dongles to the system, for example, a Zigbee wireless network controller and other devices.
▍ ARM Cortex M3 controller
In principle, the first two parts are more than enough to create a powerful IoT controller, but Kincony did not seem enough and it added to the ARM Cortex M3 board with a bunch of peripherals of connected components:
- GigaDevice GD32F103VCT6 (108 MHz, 48 kB SRAM, 256 kB Flash)
- 16 Dry Contact + 8 Digital Input
- Analog Inputs: 2 (0-5V) + 2 (4-20mA)
- 16 MOSFET outputs
- RS232 interface
- RS485 interface
- Wi-Fi module (HF-LPT230)
- Ethernet (W5500)
- Memory AT24C02 (2 KB)
- Connector 3.3, INT, SDA2, SCL2, AGND
- Connector 3.3, RST, CLK, DIO, GND
- Buttons: Wi-Fi Mode, Ethernet Mode, Wi-Fi Reset
The ARM part is made on a “decent” analogue of the popular STM microcontroller – GigaDevice GD32F103VCT6, here we see digital and analog inputs, MOSFET outputs, wired and wireless interfaces, etc., that is, a full gentleman’s set of capabilities of a modern IoT controller. Kincony turned out to be just a galactic IoT cruiser in the hull of the KC868-Server.
Role KC868-Server
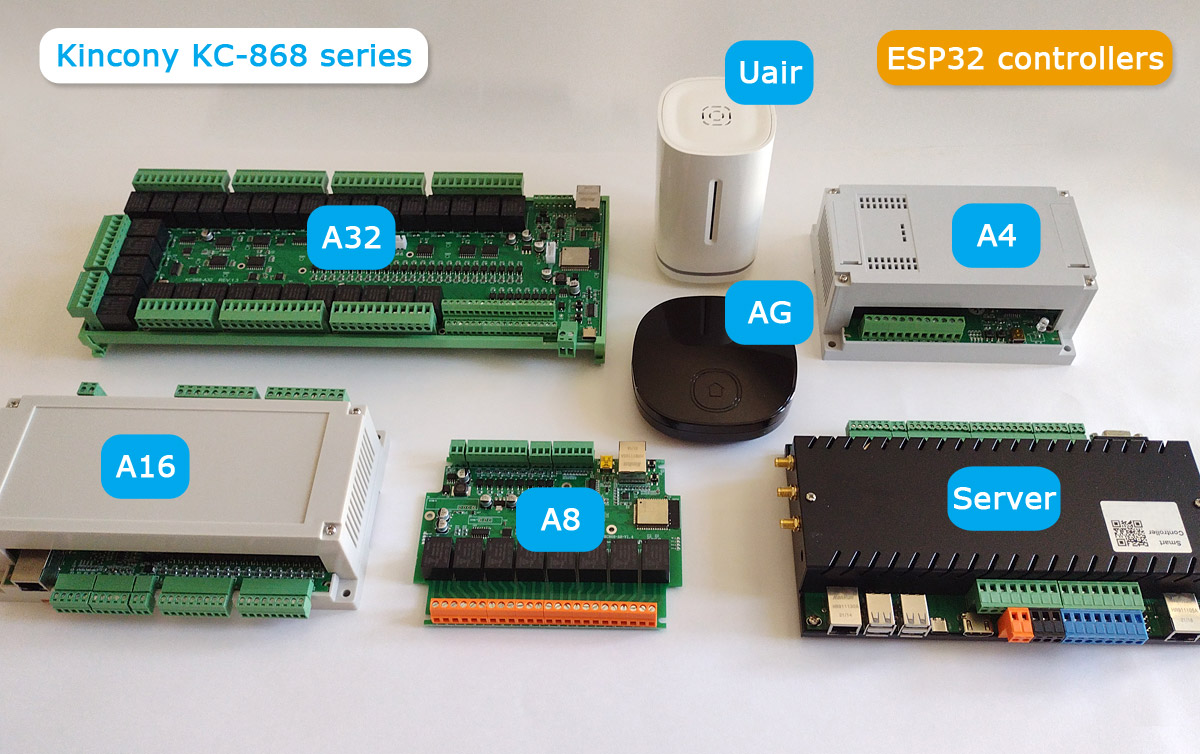
The very name KC868-Server directly indicates the purpose of this controller – to be the server of your IoT solution and it has all the capabilities and resources for this. In the basic version, the KC868-Server is designed to control the “related” controllers of the KC868 series, graphically this can be represented in the form of the following illustration.
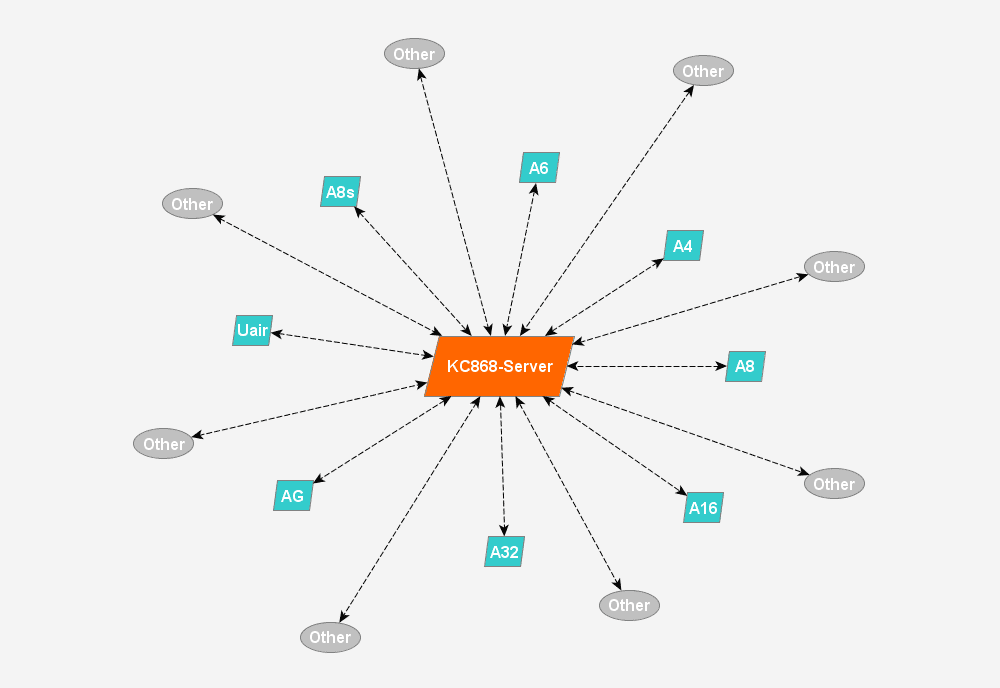
“Death Star” KC868-Server
But this is not a dogma and KC868-Server can manage any other set of IoT devices, as well as work independently, in the singular (if your specific project requires it). In addition, in the Kincony brochures there is a mention of a certain “Kincony Cloud”, so if desired, part of the functionality of your project can be tied to the cloud of the controller manufacturer.
Internal Communications
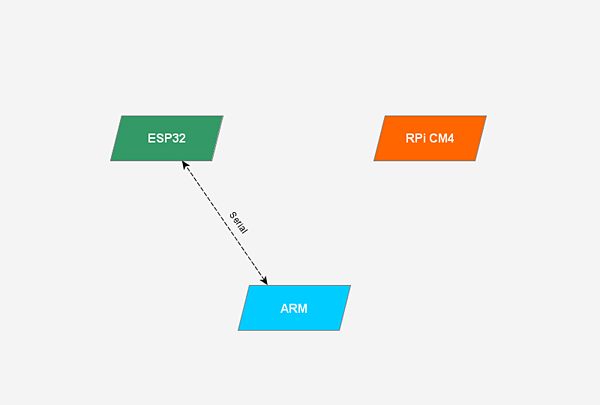
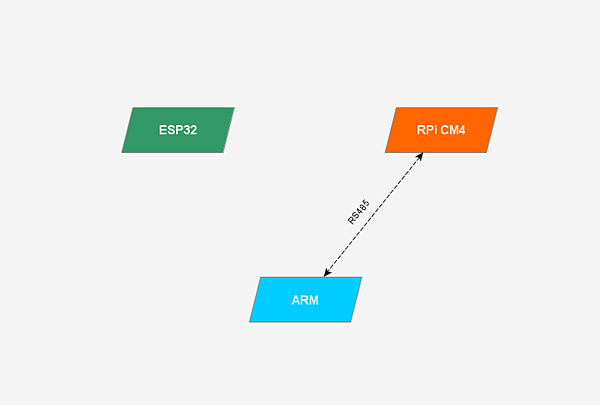
Now let’s look at another important point for understanding the concept of the KC868-Server. We are talking about inter-system communications within the controller itself between its ESP32, Raspberry Pi and ARM Cortex M3 parts.It is clear that the whole point of placing three different systems (controllers) on one board is their mutual integration and the possibility of different interaction between parts of such a (super) system. In the basic version, Kincony assumes 2 types of intersystem interaction:
- ESP32 communication is ARM via Serial connection. This type of communication is implemented on the board as tracks connecting the corresponding GPIO of both parts of the controller.
2. Communication Pi CM4 — ARM via RS485 interface. This type of communication is supposed to be implemented in the form of separate external connections. Here you need to understand that we have access to both the KC868-Server board itself and free GPIO of its various parts (controllers), so we can not be limited to the standard interconnects provided by Kincony, but organize any of our own (which is enough imagination and qualification). By the way, a good example for training can serve as a connection of ESP32 and RPi CM4 parts of KC868-Server, which is not provided in the basic version from the manufacturer.
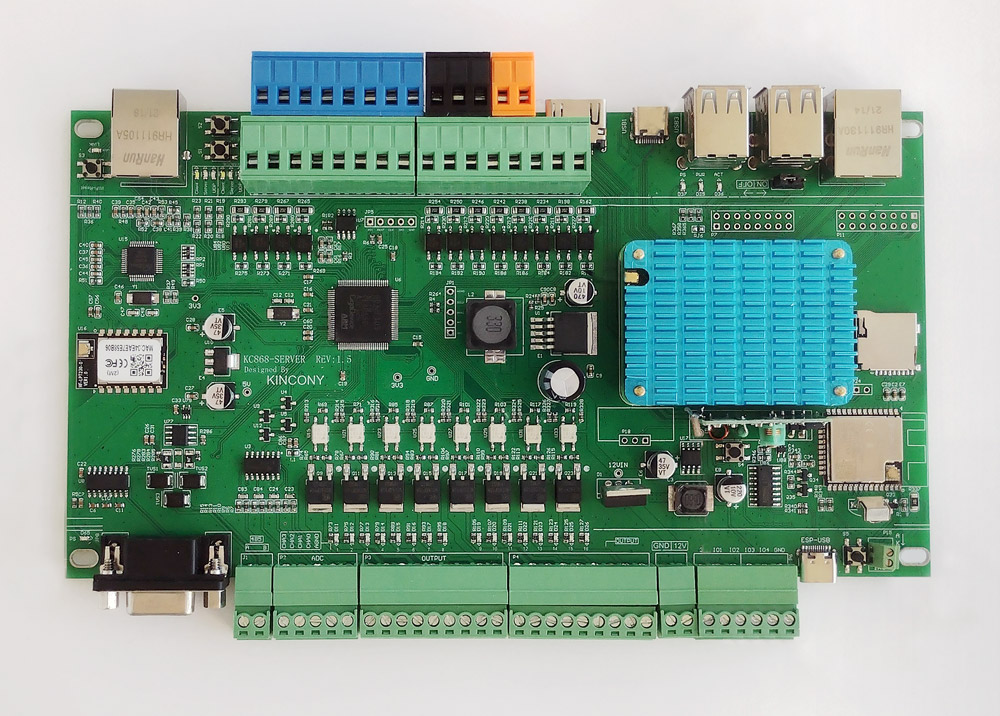
Board KC868-Server
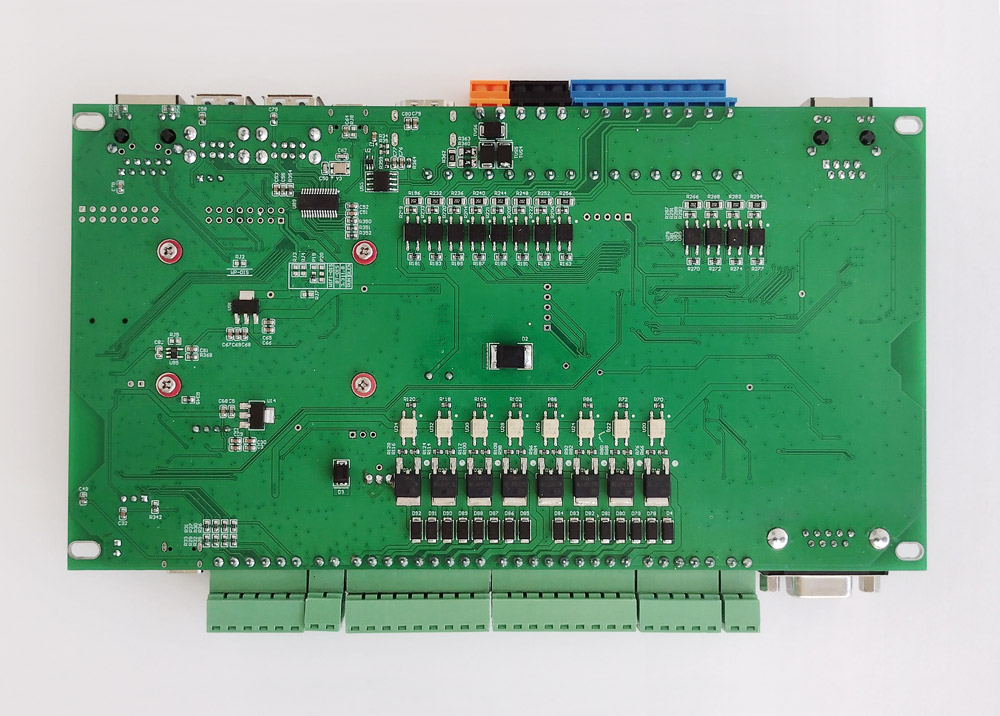
Top view of the KC868-Server board and its components. What I like about Kincony products is the accuracy in their design and manufacture – everything is done neatly and, most importantly, it all works as stated by the manufacturer. This is the first controller from the KC868 series, which uses the reverse side of the board to install electronic components (not counting the “small” controllers Uair and AG). Basically all these components relate to the ARM part of the controller.
Circuit technology
Since the size of the article is not rubber, and there is a lot of material for comprehension, so next I will analyze the esp32 circuitry of the KC868-Server controller, and I will leave the analysis of the Pi CM4 and ARM Cortex M3 parts for the next articles.
▍ Power supply
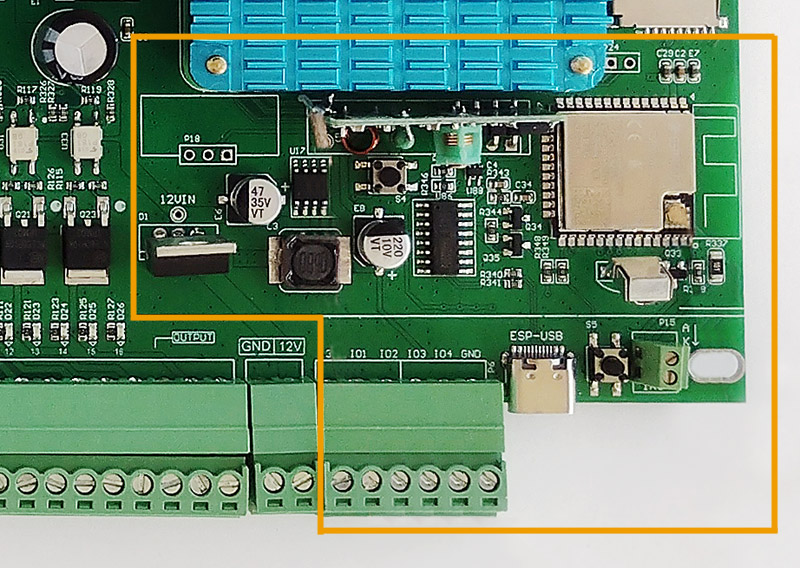
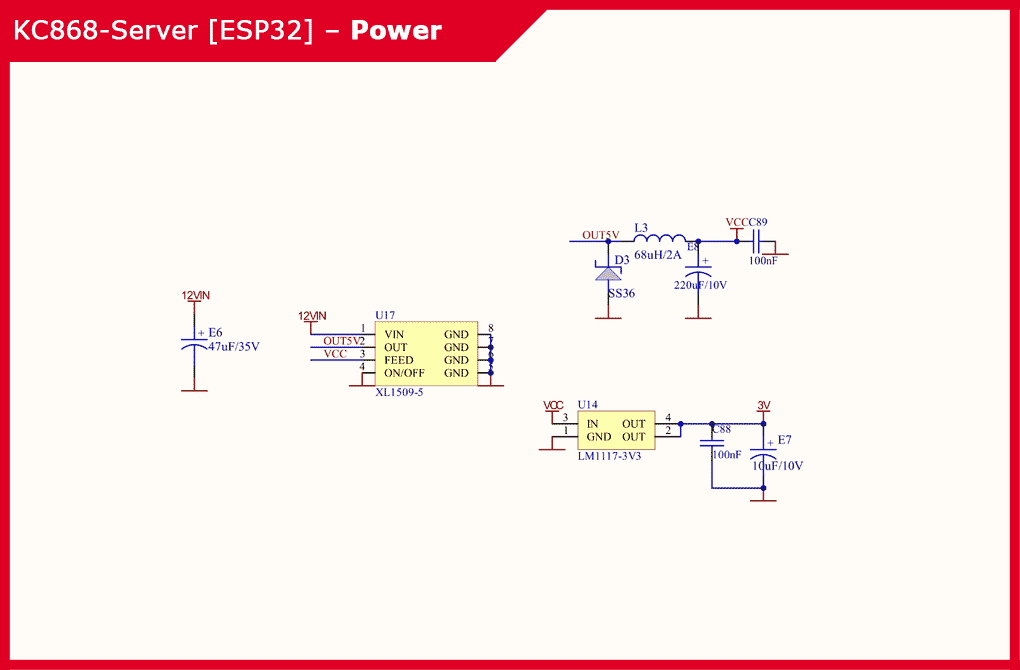
The ESP32 power subsystem of the KC868-Server controller consists of a chip step-down DC-DC converter XL1509-5 for the formation of voltages of 12 V and 5 V and a linear regulator LM117-3V3 to form a voltage of 3.3 V. KC868-Server power subsystem ESP32 part receives input voltage from a common input pad, from which the other two (ARM and CM4) parts of the controller are powered. In the photo above you can see this connector marked GND / 12V. In order to “simply” power the controller, the manufacturer recommends a 12V / 2.5A power supply, and to ensure the operation of the controller along with an additional relay control unit – 12V / 4.5A.
▍ Core ESP32 parts
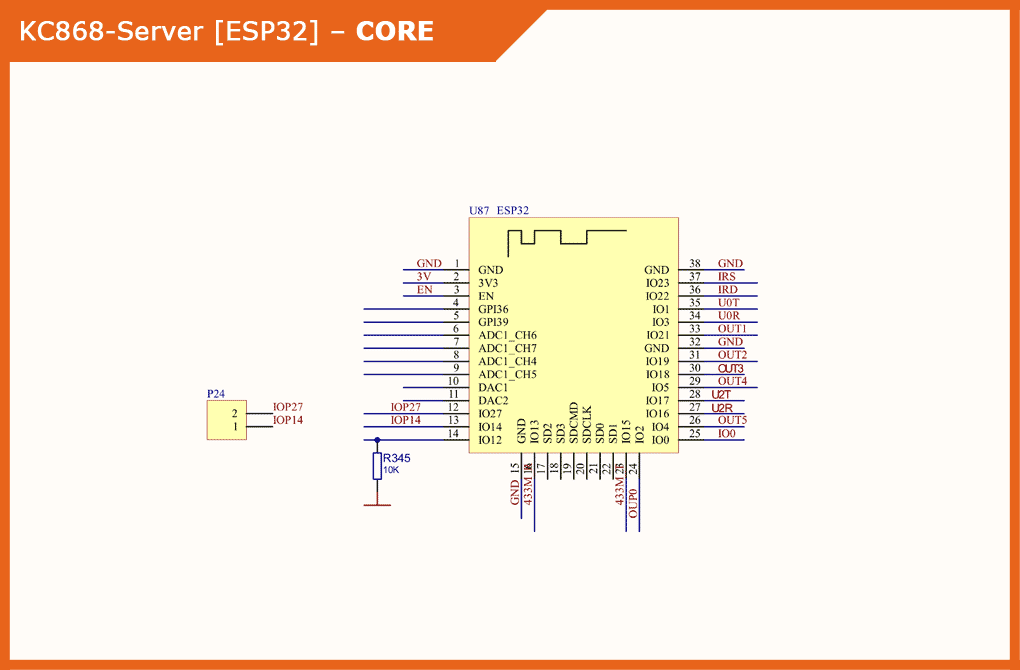
Kincony KC868-Server has an ESP32 module in the ESP-WROOM-32 modification. On the board there is a P24 connector with GPIO14 and GPIO27 output to it. It is not entirely clear its purpose, but in any case, we can use it for our needs. Also on the diagram are the pins of GPIO2 and GPIO21, which, it seems, are not actually connected anywhere and are not used in any way. Most likely, this is an error in the official documentation for the controller.
▍ USB/CH340
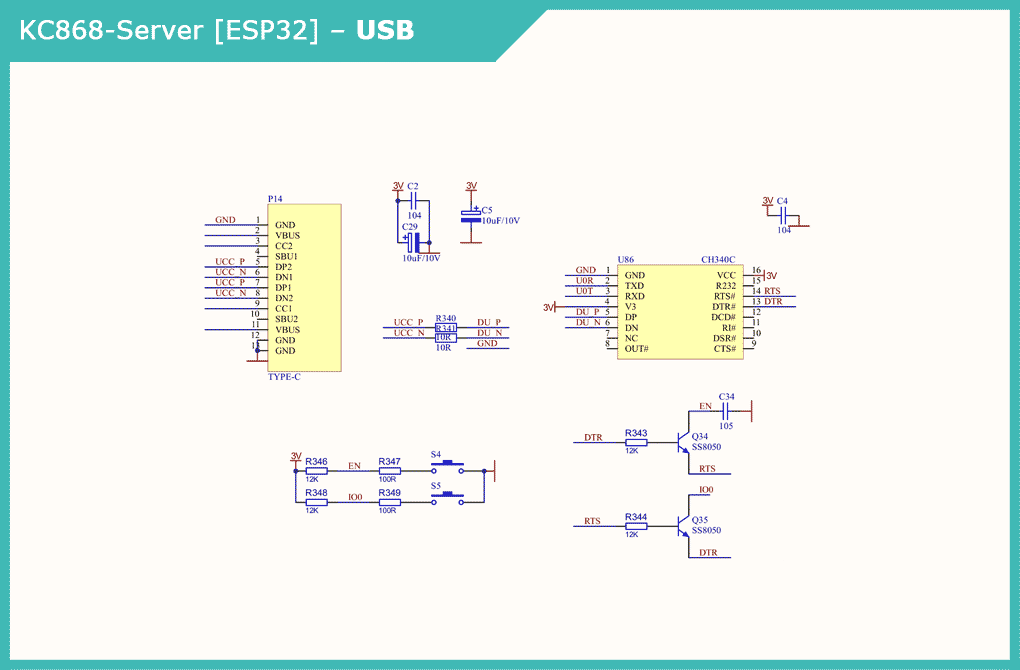
The ESP32 subsystem of the KC868-Server part of the ESP32 uses a USB Type-C connector. Operation of this unit is provided by chip CH340C. There are also two buttons S4 (RESET) and S5 (USER).
▍ Free GPIO
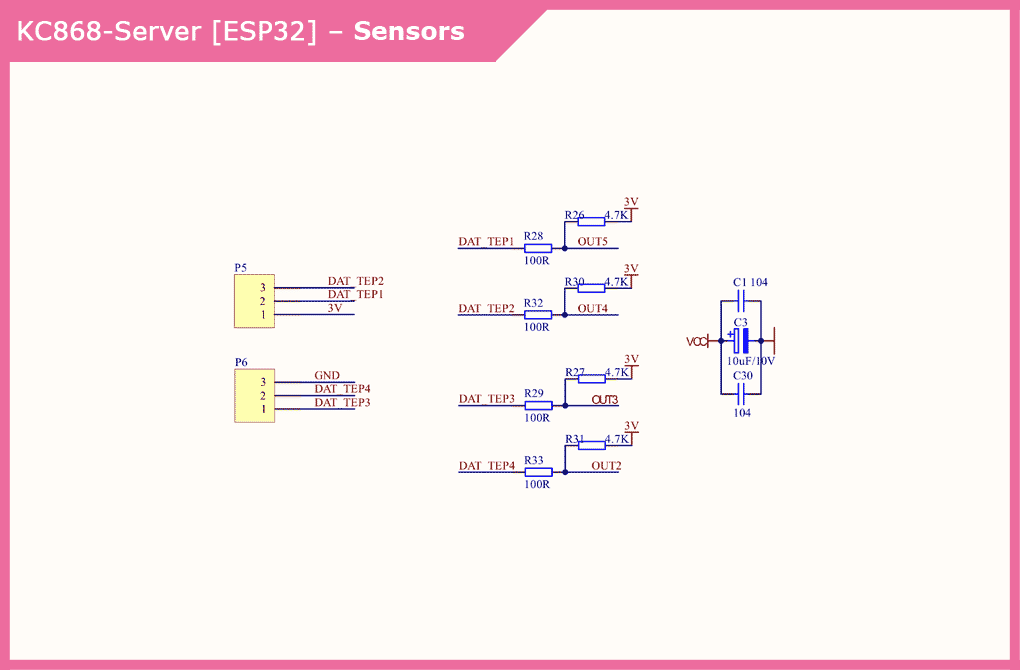
On the contact pad there are 4 GPIO with ESP32 parts of the KC868-Server controller. All these contacts can be used at your request (to connect sensors or other components), you just need to remember that on the board they are already pulled to a voltage of 3 V.
▍ IR
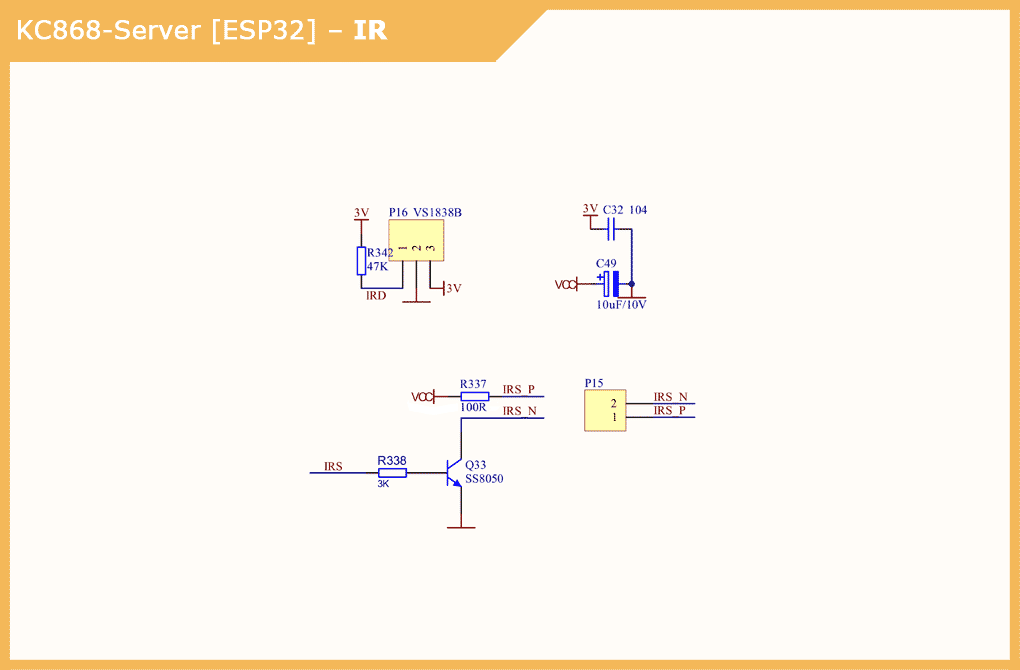
The Kincony KC868-Server is equipped with an infrared receiver and emitter. As an IR receiver, the VS1838B sensor installed on the board is used, and a special connector (P15) is provided to connect the IR emitting diode.
▍ RF 433 MHz
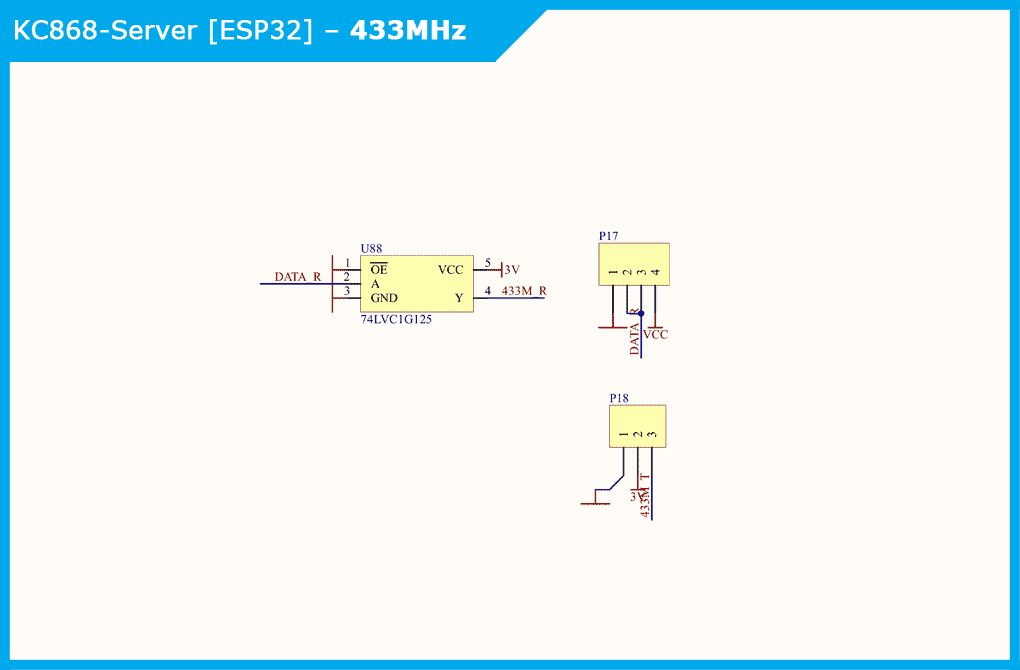
The KC868-Server provides 433 MHz wireless receiver and transmitter modules. In my version, for some reason, there is only a 433 MHz receiver, and the transmitter is not sealed at all. But the receiver directly “out of the box” is equipped with a full-fledged remote antenna.To form and supply the input signal from the receiver to the controller, a buffer element 74LVC1G125 is used, and the output signal to the transmitter is fed directly.
▍ Interface with ARM
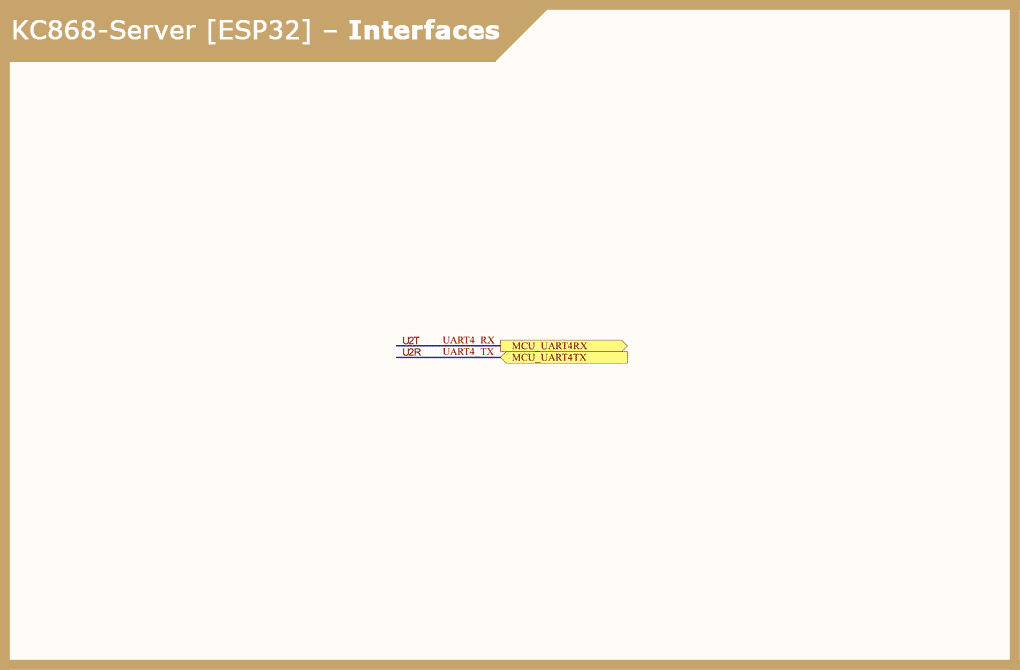
Esp32 communication with the ARM part of the KC868-Server is via Serial U2T/U2R connection (GPIO16 and GPIO17). There is nothing additional to do here – the connection between ESP32 and ARM is already laid on the board in the form of tracks.
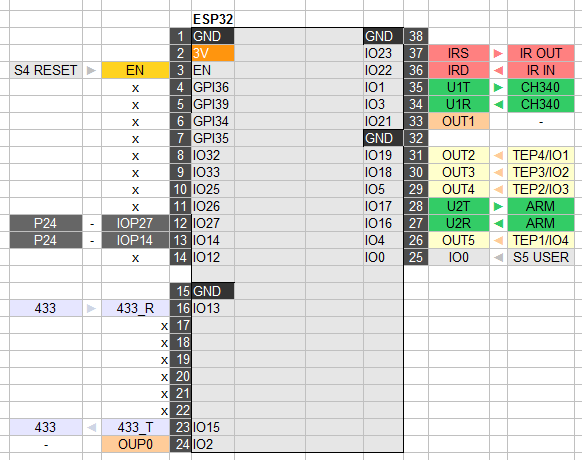
PINOUT OF ESP32 Parts
And at the end of the review of the ESP32 circuitry of the KC868-Server controller, I provide a pinout table of the ESP32 module and all the components and equipment connected to it. I would take them to a separate connector on the board – there are no extra GPIO in our business and they could always be used in their projects.
Conclusion
This concludes the first part of the discussion of the truly grandiose IoT controller Kincony KC868-Server and say goodbye to you until the next article. In the second article of this series, we will get acquainted with the device and circuitry of the RPi CM4 part of the controller and be horrified by the power and capabilities that are hidden under the metal cover of the KC868-Server.


