Welcome, Guest
You have to register before you can post on our site.

Username
  

Password


Search Forums

(Advanced Search)

Forum Statistics
» Members: 10,417
» Latest member: archerfleming
» Forum threads: 4,322
» Forum posts: 21,300

Full Statistics

Online Users
There are currently 274 online users.
» 0 Member(s) | 251 Guest(s)
Amazonbot, AwarioBot, Baidu, Bing, Crawl, Google, HeadlessChrome, PetalBot, Semrush, bot

Latest Threads
KC868-A4 – Relay 1 clicks...
Forum: KC868-A series and Uair Smart Controller
Last Post: admin
Yesterday, 11:58 PM
» Replies: 3
» Views: 21
⚡ 40 Buttons, 36 Lighting...
Forum: DIY Project
Last Post: lulu01
Yesterday, 07:34 PM
» Replies: 24
» Views: 2,942
[arduino code examples fo...
Forum: CO16
Last Post: admin
Yesterday, 03:04 AM
» Replies: 0
» Views: 7
[arduino code examples fo...
Forum: CO16
Last Post: admin
Yesterday, 01:34 AM
» Replies: 0
» Views: 12
[arduino code examples fo...
Forum: CO16
Last Post: admin
Yesterday, 12:15 AM
» Replies: 0
» Views: 14
450 Hz allowed on input?
Forum: Development
Last Post: admin
11-02-2026, 09:41 PM
» Replies: 3
» Views: 28
How Do You Handle Relay C...
Forum: KC868-A6
Last Post: lulu01
11-02-2026, 05:41 PM
» Replies: 2
» Views: 24
"KCS" v3.27.4 firmware BI...
Forum: "KCS" v3 firmware
Last Post: admin
11-02-2026, 06:02 AM
» Replies: 0
» Views: 50
how to check i2c extend c...
Forum: T16M
Last Post: admin
11-02-2026, 12:38 AM
» Replies: 0
» Views: 14
T16M ESPHome yaml for hom...
Forum: T16M
Last Post: admin
11-02-2026, 12:35 AM
» Replies: 0
» Views: 11

Heart [Arduino demo source code for KC868-A4]-08 control relay by BlueTooth
Posted by: KinCony Support - 01-07-2022, 05:12 AM - Forum: KC868-A4 - No Replies

Code 7: //The demo code is Bluetooth    You can copy the code to your Arduino IDE.

Code:
#include "BluetoothSerial.h"

// init Class:
BluetoothSerial ESP_BT;

// init PINs: assign any pin on ESP32
int Relay1 = 2;
int Relay2 = 15;
int Relay3 = 5;
int Relay4 = 4;

// Parameters for Bluetooth interface
int incoming;

void setup() {
  ESP_BT.begin("KC868-A4-BlueTooth"); //Name of your Bluetooth interface -> will show up on your phone

  pinMode (Relay1, OUTPUT);
  pinMode (Relay2, OUTPUT);
  pinMode (Relay3, OUTPUT);
  pinMode (Relay4, OUTPUT);
}


void loop() {
 
  // -------------------- Receive Bluetooth signal ----------------------
  if (ESP_BT.available())
  {
    incoming = ESP_BT.read(); //Read what we receive

    // separate button ID from button value -> button ID is 10, 20, 30,40 etc, value is 1 or 0
    //Relay1 ON:11  OFF:10
    //Relay2 ON:21  OFF:20
    //Relay3 ON:31  OFF:30
    //Relay4 ON:41  OFF:40    
    int button = floor(incoming / 10);
    int value = incoming % 10;
   
    switch (button) {
      case 1: 
        digitalWrite(Relay1, value);
        break;
      case 2: 
        digitalWrite(Relay2, value);
        break;
      case 3: 
        digitalWrite(Relay3, value);
        break;
      case 4: 
        digitalWrite(Relay4, value);
        break;      
    }
  }
}

Print this item

Heart [Arduino demo source code for KC868-A4]-07 voice control by alexa speaker
Posted by: KinCony Support - 01-07-2022, 03:13 AM - Forum: KC868-A4 - Replies (2)

Code 6: //The demo code is Alexa control     You can copy the code to your Arduino IDE

Code:
#ifdef ARDUINO_ARCH_ESP32
#include <WiFi.h>
#else
#include <ESP8266WiFi.h>
#endif
#include <Espalexa.h>

#define Relay1 2
#define Relay2 15
#define Relay3 5
#define Relay4 4

// prototypes
boolean connectWifi();

//callback functions
void F1LightChanged(uint8_t brightness);
void F2LightChanged(uint8_t brightness);
void F3LightChanged(uint8_t brightness);
void F4LightChanged(uint8_t brightness);

// Change this!!

// WiFi Credentials
const char* ssid = "KinCony";           //input your router's SSID
const char* password = "a12345678";    // input your router's password

// device names
String Device_1_Name = "Yellow light";
String Device_2_Name = "Green light";
String Device_3_Name = "Blue light";
String Device_4_Name = "Red light"; 


boolean wifiConnected = false;

Espalexa espalexa;

void setup()
{
  Serial.begin(115200);
  pinMode(Relay1, OUTPUT);
  pinMode(Relay1, LOW);

  pinMode(Relay2, OUTPUT);
  pinMode(Relay2, LOW);

  pinMode(Relay3, OUTPUT);
  pinMode(Relay3, LOW);

  pinMode(Relay4, OUTPUT);
  pinMode(Relay4, LOW);     

  // Initialise wifi connection
  wifiConnected = connectWifi();

  if (wifiConnected)
  {
    // Define your devices here.
          espalexa.addDevice(Device_1_Name,F1LightChanged);
          espalexa.addDevice(Device_2_Name,F2LightChanged);
          espalexa.addDevice(Device_3_Name,F3LightChanged);
          espalexa.addDevice(Device_4_Name,F4LightChanged);

    espalexa.begin();

  }

  else
  {
    while (1)
    {
      Serial.println("Cannot connect to WiFi. Please check data and reset the ESP.");
      delay(2500);
    }
  }

}

void loop()
{
  espalexa.loop();
  delay(1);
}

//our callback functions
void F1LightChanged(uint8_t brightness)
{
  //Control the device
  if (brightness)
  {
    if (brightness == 255)
    {
      digitalWrite(Relay1,HIGH);
    }

  }
  else
  {
   digitalWrite(Relay1, LOW);
  }
}

void F2LightChanged(uint8_t brightness)
{

  //Control the device
  if (brightness)
  {
    if (brightness == 255)
    {
      digitalWrite(Relay2,HIGH);
    }

  }
  else
  {
   digitalWrite(Relay2,LOW);
  }
}

void F3LightChanged(uint8_t brightness)
{

  //Control the device 
  if (brightness)
  {
    if (brightness == 255)
    {
     digitalWrite(Relay3,HIGH);
    }
  }
  else
  {
     digitalWrite(Relay3,LOW);
  }
}

void F4LightChanged(uint8_t brightness)
{

  //Control the device
  if (brightness)
  {
    if (brightness == 255)
    {
     digitalWrite(Relay4,HIGH);
    }
  }
  else
  {
    digitalWrite(Relay4,LOW);
  }
}


// connect to wifi – returns true if successful or false if not
boolean connectWifi()
{
  boolean state = true;
  int i = 0;

  WiFi.mode(WIFI_STA);
  WiFi.begin(ssid, password);

  // Wait for connection
  Serial.print("Connecting...");
  while (WiFi.status() != WL_CONNECTED) {
    delay(500);
    Serial.print(".");
    if (i > 20) {
      state = false; break;
    }
    i++;
  }
  Serial.println("");
  if (state) {
    Serial.print("Connected to ");
    Serial.println(ssid);
    Serial.print("IP address: ");
    Serial.println(WiFi.localIP());
  }
  else {
    Serial.println("Connection failed.");
  }
  return state;
}


Attached Files Thumbnail(s)
   
Print this item

Heart [Arduino demo source code for KC868-A4]-06 analog output (DAC) data
Posted by: KinCony Support - 01-07-2022, 02:58 AM - Forum: KC868-A4 - No Replies

Code 5: //The demo code is DAC    You can copy the code to your Arduino IDE

Code:
#define DAC1 26   //DAC1 IO26
//#define DAC2 25   //DAC2 IO25

void setup() {
 
}

void loop() {
  int Value = 127; //255= 10V
 
  dacWrite(DAC1, 1);
  delay(500);
  dacWrite(DAC1, 50);
  delay(500);
  dacWrite(DAC1, 100);
  delay(500);
  dacWrite(DAC1, 150);
  delay(500); 
  dacWrite(DAC1, 255);
  delay(500); 
}
   

Print this item

Heart [Arduino demo source code for KC868-A4]-05 read analog input (ADC) data
Posted by: KinCony Support - 01-07-2022, 02:42 AM - Forum: KC868-A4 - No Replies

Code 4: //The demo code is ADC INPUT    You can copy the code to your Arduino IDE

Code:
#define ANALOG_PIN_32   32      //INA1  CH5

// #define ANALOG_PIN_33   33   //INA2  CH4
// #define ANALOG_PIN_34   34   //INA3  CH6
// #define ANALOG_PIN_35   35   //INA4  CH7


void setup(){
  Serial.begin(115200);
  pinMode(ANALOG_PIN_32,INPUT);
}

void loop() {
  int analog_value = 0;
  analog_value = analogRead(ANALOG_PIN_32);   //0--4096
  delay(1000);
  Serial.printf("Current Reading on Pin(%d)=%d\n",ANALOG_PIN_32,analog_value);
}
   

Print this item

Heart [Arduino demo source code for KC868-A4]-04 read DS18B20 temperature sensor
Posted by: KinCony Support - 01-07-2022, 02:21 AM - Forum: KC868-A4 - No Replies

Code 3: //The demo code is DS18B20    You can copy the code to your Arduino IDE

Code:
#include <DS18B20.h>

#define LOW_ALARM 20
#define HIGH_ALARM 25

DS18B20 ds(13);   //IO13

void setup() {
  Serial.begin(9600);

  while (ds.selectNext()) {
    ds.setAlarms(LOW_ALARM, HIGH_ALARM);
  }
}

void loop() {
  ds.doConversion();

  while (ds.selectNextAlarm()) {
    Serial.print("Alarm Low: ");
    Serial.print(ds.getAlarmLow());
    Serial.println(" C");
    Serial.print("Alarm High: ");
    Serial.print(ds.getAlarmHigh());
    Serial.println(" C");
    Serial.print("Temperature: ");
    Serial.print(ds.getTempC());
    Serial.println(" C\n");
  }

  delay(1000);
}
       

Print this item

Heart [Arduino demo source code for KC868-A4]-03 send 433MHz RF signal
Posted by: KinCony Support - 01-07-2022, 02:18 AM - Forum: KC868-A4 - No Replies

Code 2: //The demo code is RF-send  You can copy the code to your Arduino IDE

Code:
#include <RCSwitch.h>

RCSwitch mySwitch = RCSwitch();

void setup() {

  Serial.begin(9600);
    mySwitch.enableTransmit(21);  // IO21
  }

void loop() {

  /* See Example: TypeA_WithDIPSwitches */
  mySwitch.switchOn("11111", "00010");
  delay(1000);
  mySwitch.switchOff("11111", "00010");
  delay(1000);

  /* Same switch as above, but using decimal code */
  mySwitch.send(5393, 24);
  delay(1000); 
  mySwitch.send(5396, 24);
  delay(1000); 

  /* Same switch as above, but using binary code */
  mySwitch.send("000000000001010100010001");
  delay(1000); 
  mySwitch.send("000000000001010100010100");
  delay(1000);

  /* Same switch as above, but tri-state code */
  mySwitch.sendTriState("00000FFF0F0F");
  delay(1000); 
  mySwitch.sendTriState("00000FFF0FF0");
  delay(1000);

  delay(20000);
}
   

Print this item

Heart [Arduino demo source code for KC868-A4]-02 433MHz RF signal receive decode
Posted by: KinCony Support - 01-07-2022, 02:13 AM - Forum: KC868-A4 - No Replies

Code 1: //The demo code is RF-receive    You can copy the code to your Arduino IDE

Code:
#include <RCSwitch.h>

RCSwitch mySwitch = RCSwitch();

void setup() {
  Serial.begin(9600);
  mySwitch.enableReceive(digitalPinToInterrupt(19));  //IO19
  Serial.print("begin test");
}

void loop() {
  if (mySwitch.available()) {
   
    Serial.print("Received ");
    Serial.print( mySwitch.getReceivedValue() );
    Serial.print(" / ");
    Serial.print( mySwitch.getReceivedBitlength() );
    Serial.print("bit ");
    Serial.print("Protocol: ");
    Serial.println( mySwitch.getReceivedProtocol() );

    mySwitch.resetAvailable();
  }
}
   

Print this item

Heart [Arduino demo source code for KC868-A4]-01 config Arduino IDE for ESP32 module
Posted by: KinCony Support - 01-07-2022, 02:06 AM - Forum: KC868-A4 - No Replies

 Before using KC868-A4, you need to set the parameters of the preference

Copy the following URL:https://dl.espressif.com/dl/package_esp32_index.json

       
.pdf   KC868-A4-schematic.pdf (Size: 244.64 KB / Downloads: 1394)

Print this item

  KC868-D8 V4.37 new firmware update
Posted by: admin - 01-06-2022, 12:03 PM - Forum: News - Replies (5)

improvement:

when switch button work in "1 Key" mode . we let the "UP" and "DOWN" button ports with the same function. so that easy for connect two thick wire from two different places. such as this two thick wire not easy connect to one terminal pole.


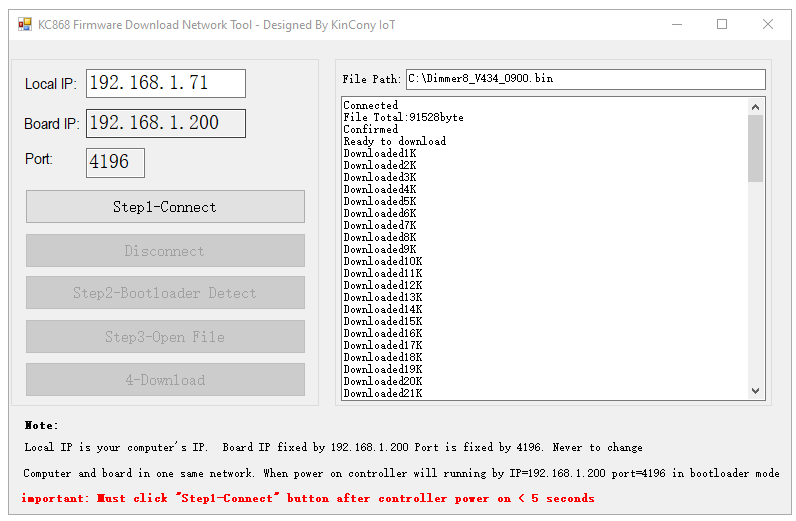
update BIN file firmware by "KC868 Controller Network Bootloader" tool.

[Image: KC868-Controller-Network-Bootloader.png]
KC868 Controller Network Bootloader  

[Image: zip.png]   KC868 Controller Network Bootloader.zip

firmware BIN file

.zip   Dimmer8_V437_0106.zip (Size: 45.49 KB / Downloads: 1152)

Print this item

  Smart Home Hardware
Posted by: Mati - 01-06-2022, 10:58 AM - Forum: DIY Project - Replies (7)

Hello all,
Which one of your product do you recommend for home automation.
I have RaspberryPi with home assistant. I would like to control blinds and lights via HA and also via manual wall switches. And later adding some sensors and stuff…
I was looking at Kincony relay module but there is so many options that I dont know which to choose for the best output.


Here is shematic what I would like to achieve.


Print this item